scikit-learnインストール時のエラー対策2
以前,scikit-learnインストール時のエラー対策で
CentOS7にnumpy-1.10.1 + scikit-learn-0.16.1の環境を構築した時に以下のエラーが発生し,numpyを1.9.3にすることでエラーを回避した.
(VENV)$ pip isntall scikit-learn
...
/usr/bin/ld: cannot find -lcblas
    collect2: error: ld returned 1 exit status
    /usr/bin/ld: cannot find -lcblas
    collect2: error: ld returned 1 exit status
    error: Command "g++ -pthread -shared build/temp.linux-x86_64-2.7/sklearn/svm/liblinear.o build/temp.linux-x86_64-2.7/sklearn/svm/src/liblinear/tron.o build/temp.linux-x86_64-2.7/sklearn/svm/src/liblinear/linear.o -L/usr/lib64/atlas -Lbuild/temp.linux-x86_64-2.7 -lcblas -lm -o build/lib.linux-x86_64-2.7/sklearn/svm/liblinear.so" failed with exit status 1
今回,numpy-1.10.4 + scikit-learn-0.17でも同様のエラーが発生した.
調べてみると,下のページが見つかった
cblasはatlasの中にあるそうなので
$ ln -s /usr/lib64/atlas/libsatlas.so /usr/lib64/atlas/libcblas.so
とすればいいらしいのでやってみると
(VENV)$ pip install scikit-learn
Collecting scikit-learn
  Using cached scikit-learn-0.17.tar.gz
Building wheels for collected packages: scikit-learn
  Running setup.py bdist_wheel for scikit-learn
  Stored in directory: /root/.cache/pip/wheels/f6/4e/d3/9f5a279531fddfc7fa3979adb24041323e4fb7421756261921
Successfully built scikit-learn
Installing collected packages: scikit-learn
Successfully installed scikit-learn-0.17
うまくいった.
UbuntuでIPを固定する
Ubuntu15.10 ServerでのIP固定方法
resolvconfのインストール
/etc/network/interfaces内にDNSの設定もまとめられるようにする
$ sudo apt-get -y install resolvconf
設定ファイルの編集
$ sudo vim /etc/network/interfaces
#iface eth0 inet dhcp
iface eth0 inet static
    address ホストIP
    netmask ネットマスク
    gateway ゲートウェイ
    dns-nameservers DNSサーバ(スペース区切りで複数設定可)
変更の適用
$ sudo reboot
Raspberry Piを簡易DNSサーバにする
RaspbianをディスプレイなしでインストールするでRaspberryPi2 ModelBにインストールしたRaspbian Jessie Liteを使用した
DNSサーバのインストール
$ sudo apt-get -y install dnsmasq
上位DNSサーバの設定
DNSサーバの設置環境が
WAN - 192.168.11. - 192.168.19. - RaspberryPi (192.168.19.104)
となっているので以下のように上位DNSを192.168.11.1に設定する
$ sudo vim /etc/dhcpcd.conf
...
interface eth0
static ip_address=192.168.19.104/24
static routers=192.168.19.1
static domain_name_servers=192.168.11.1
DNSレコードの編集
/etc/hosts内にDNSレコードを追加する
$ sudo vim /etc/hosts

127.0.0.1     localhost
127.0.1.1     raspberrypi

192.168.19.2  HOST1
192.168.19.3  HOST2
...
DNSサーバ起動
$ sudo service dnsmasq restart
$ sudo sysv-rc-conf dnsmasq on
ルータの設定
ルータ(192.168.19.1)がデフォルトで使用するDNSサーバを変更する
Aterm WG1800HP2の場合は
トップページ > 基本設定 > 接続先設定で
と設定した
Raspbianをディスプレイなしでインストールする
Raspbianをダウンロード
Download Raspbian for Raspberry Piから
RASPBIAN JESSIE LITE (2015-11-21-raspbian-jessie-lite.img)をダウンロードする
Raspbianの書き込み
Raspbianの書き込みにはUbuntu15.10を使用する
ddを使った方法ではRaspbianが起動できなかったので
ディスクイメージライターを使用して書き込んだ

IPアドレスを調べる
ルータのDHCP割り当て状態から
Raspberry PiのMACアドレス(B8:27:EB:??:??:??)に割り当てられているIPを調べる
ルータで調べられない場合は以下のスクリプトで調べる
readonly IP_NETWORK=192.168.19
for host in `seq 1 254`; do
    ping -c 1 -w 0.5 ${IP_NETWORK}.${host} > /dev/null
    arp -a ${IP_NETWORK}.${host} | grep ether
done
SSHでログインする
- ユーザー名: pi
- パスワード: raspberry
でログインする
IP固定
vimのインストール
$ sudo apt-get -y install vim
/etc/dhcpcd.confの編集
$ sudo vim /etc/dhcpcd.conf
interface eth0
static ip_address=192.168.19.104/24
static routers=192.168.19.1
static domain_name_servers=192.168.19.1
再起動
$ sudo reboot
epgrecで失敗した予約録画の削除方法
epgrecの録画済一覧で削除できないデータを削除する方法
データベースに接続する
$ mysql -u ユーザー名 -p
Enter password:
データベースの切り替え
> show databases;
+--------------------+
| Database           |
+--------------------+
| information_schema |
| epgrec             |
+--------------------+

> use epgrec;
Reading table information for completion of table and column names
You can turn off this feature to get a quicker startup with -A
録画idの確認
> select id, title from Recorder_reserveTbl where complete = 0 and endtime < now();
+----+-----------------+
| id | title           |
+----+-----------------+
| 28 | 録画タイトル1   |
| 36 | 録画タイトル2   |
+----+-----------------+
録画済みフラグを立てる
> update Recorder_reserveTbl set complete = 1 where id = 録画id;
Query OK, 1 row affected (0.00 sec)
終了
> exit;
これでepgrec上で手動で録画済一覧から削除できるようになる
virtualenvにMedpyをインストールする
virtualenvにMedpyをインストールした際の備忘録
実行環境は
* CentOS7
* Python2.7.10 (Python2.7.10をソースからインストールする)
仮想環境作成
$ mkvirtualenv --python /opt/python2.7.10/bin/python2.7 --no-site-packages medpy
numpyのインストール
(medpy)$ pip install numpy
Successfully installed numpy-1.10.1
scipyのインストール
gcc,必要なライブラリのインストール
$ sudo dnf -y install gcc-g++
$ sudo dnf -y install atlas-devel lapack-devel blas-devel
scipyをインストール
(medpy)$ pip install scipy
Successfully installed scipy-0.16.1
nibabelのインストール
MedPyで
- NifTi - Neuroimaging Informatics Technology Initiative (.nii, nii.gz)
- Analyze (plain, SPM99, SPM2) (.hdr/.img, .img.gz)
などを読み込むのに必要
(medpy)$ pip install nibabel
Successfully installed nibabel-2.0.2
pydicomのインストール
MedPyでDicomを読み込むのに必要
(medpy)$ pip install pydicom
Successfully installed pydicom-0.9.9
ITKのインストール
MedPyで
- NifTi - Neuroimaging Informatics Technology Initiative (.nii, nii.gz)
- Analyze (plain, SPM99, SPM2) (.hdr/.img, .img.gz)
- Dicom - Digital Imaging and Communications in Medicine (.dcm, .dicom)
- Itk/Vtk MetaImage (.mhd, .mha/.raw)
- Nrrd - Nearly Raw Raster Data (.nhdr, .nrrd)
などを読み込むのに必要
CentOS7へのリポジトリの追加方法まとめを参考にEPELを追加し,インストールする
$ sudo yum --enablerepo=epel -y install itk-devel
MedPyのインストール
(medpy)$ pip install medpy
Successfully installed medpy-0.2.2
SPICEを使用するKVM Linuxゲストの作成
ホストOSはCentOS7,ゲストOSはFedora23を使用した
インストールはUbuntu15.04のvirt-managerから行った
ゲストOSのインストール
- インストールの前に設定をカスタマイズするにチェックを入れる
- ブリッジを使用する場合は詳細なオプションを開きブリッジ名を指定する
- ディスクパス: VirtIO
- キャッシュモデル: none
- IOモード: native
- デバイスのモデルをvirtioに変更する
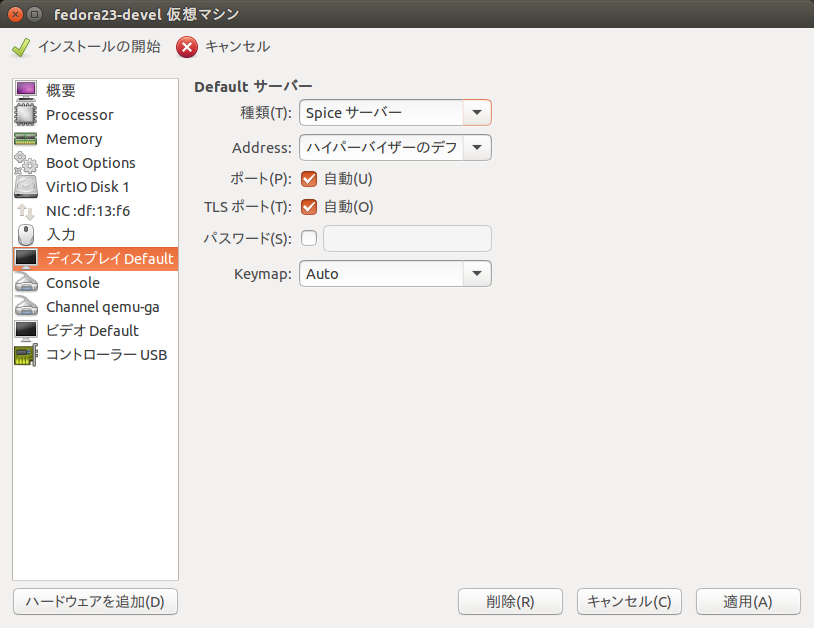
- ディスプレイのDefaultサーバーをSpiceサーバーに変更する(ポート等はあとで設定する)
- ビデオモデルをQXLに変更する
- インストールの開始を押し,通常通りインストールを行う
ゲストの設定
LAN内のみでの運用を前提としているため
- image compression
- playback compression
をoffにする
ゲストをシャットダウンし,設定ファイルを編集する
$ sudo virsh edit 仮想マシン名
88行目あたりの
<graphics type='spice' autoport='yes'/>
を以下の様に書き換え,firewallを使用している場合は指定したポートの開放も行う
<graphics type='spice' port='任意のポート' autoport='no' listen='0.0.0.0'>
    <listen type='address' address='0.0.0.0'/>
    <image compression='off'/>
    <playback compression='off'/>
</graphics>
ゲストツールのインストール
仮想マシンを起動し,仮想マシンに以下のパッケージをインストールする
$ sudo dnf -y install spice-vdagent


